
How To Apply Dry Transfer Decals
STEP 1:
Dry transfer decals are a popular choice among scale modelers and hobbyists due to their ease of use and versatility in scale modelling. These decals can achieve a look that appears painted on when properly applied, making them highly desirable for detailed projects. Cut out 1 example with the backing sheet in place. Visually centering, aligning and placing the Rub On Transfer straight will be easier and quicker to do so accurately if the transfer is cut out straight and square.
STEP 2:
Once the transfer is in the position you want, lightly push down on the image. If the space allows and/or the transfer image has a large area, hold the top corner of the sheet from moving and lightly run your finger over the entire transfer image area. Start at the top left side and in a diagonal motion, move from the top to the bottom right. The top left to bottom right diagonal movement is typically the most natural and comfortable movement and along with the use of your finger, should ensure that no pockets of air are created or formed.
STEP 3:
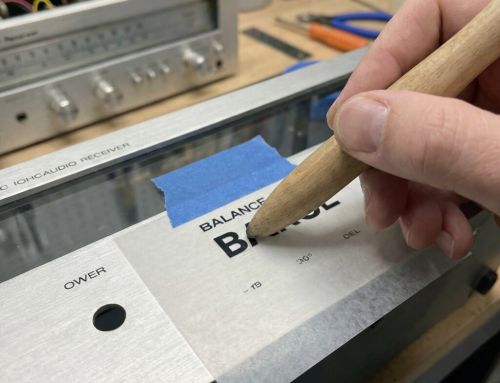
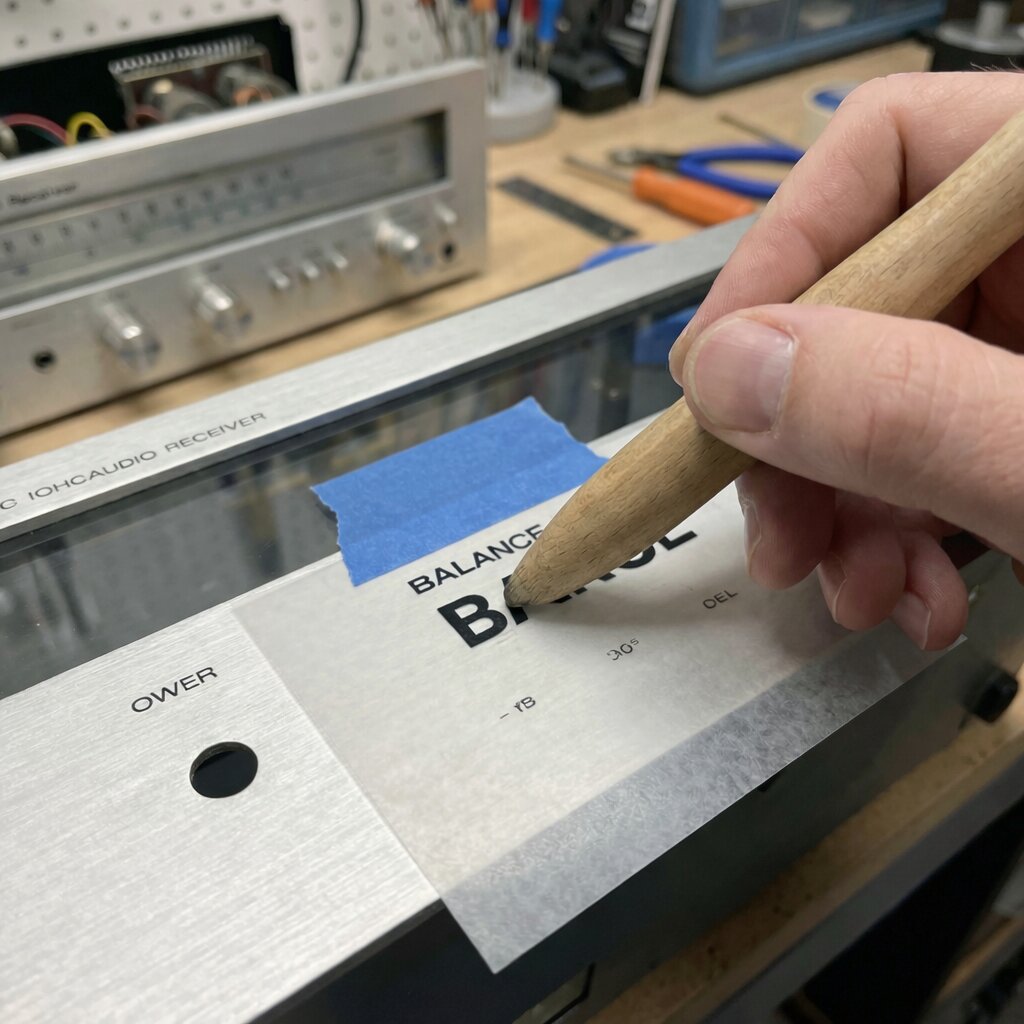
With a burnisher, or a similar tool described in the Suggested Tools page, apply a light pressure, approximately like that of writing with a ball point pen, use the top to bottom diagonal motion while slightly overlapping the strokes as if you were painting or coloring. Random scribbling can produce visible lines, marks, or air bubbles.
STEP 4:
The transfer image color will ghost or frost indicating that the image is releasing from the transfer sheet. Ghost as much of the image as possible. Pay particular attention to small details if there are any, such as small text. A ballpoint burnish is ideal for retracing small details that a larger surface spoon burnish may skim over. Increased pressure is not needed for small details. While using the ballpoint burnish, you should be able to feel the raised contour of the details as you pass over the image edge. Feeling the edges and contours is a good indication that the pressure is sufficient and ideal.
STEP 5:
A knife or something with a pointy tip can be used to pick up and place the cutout transfer image and/or a burnisher can be used to push or move the cutout transfer image into position.
STEP 6:
To peel the transfer film from the rub on image, hold, if possible, the bottom right corner of the transfer, then slowly lift the top left corner of the transfer sheet and verify that the image is releasing and is adhering to the intended surface.
STEP 7:
If the image is not sticking or releasing from the sheet, stop lifting the translucent film and re-burnish (rub) the area that is not adhering.
STEP 8:
Once the translucent sheet has been completely removed, place a piece of the backing sheet on top of the image and re-burnish the applied Rub On Transfer to ensure that the image has adhered across the entire transfer image surface.


Tips and Tricks
QUICK POINTS
• Always keep the white parchment backing sheet in place
• Always re-burnish the applied image with the backing sheet for ink transfers and for Foil transfers use the clear support film.
BASIC RUB ON TRANSFER HANDLING
• Always keep the white parchment backing sheet in place until the transfer is on the surface you will be applying to.
• Avoid touching the transfer sheet anywhere near or on an image if the backing sheet is not in place as the slightest pressure will cause the adhesive to stick to your surface.
• The pressure-sensitive adhesive which is only on the image is designed to be significantly stronger than the bond of the image to the transfer sheet. Avoid touching the transfer sheet anywhere near an image if the backing sheet is not in place. The bond of the image to the transfer sheet is sufficient to allow the image to touch the surface without adhering but, our custom formulation and application of the adhesive is maximized to perform well on a broad range of surfaces and the extended shelf-life properties may, on some surfaces, cause the image to adhere with a slight touch.
APPLICATION SURFACE BASICS
• Most surfaces need little to no preparation if they are free of dust, grease, or oil.
• Another important factor is the surface characteristic such as texture and integrity. Surfaces take on a matte sheen when they have raised and depressed areas also referred to as hills and valleys. Some surfaces such as uncoated fibrous papers have a surface that is not fixed. The fibers or paper dust slough off leaving behind loose particles on the surface. These particles stick to the adhesive making that area where they have adhered no longer sticky. The remaining surface that is still sticky adheres to other loose particles that then slough off during the peeling process which further reduces or eliminates an effective bond to the surface adhesive
Introduction
Dry transfer decals are a popular choice among scale modelers and hobbyists due to their ease of use and versatility. Unlike traditional water slide decals, dry transfer decals do not require water or a decal setting solution to apply. Instead, they use a pressure-sensitive adhesive to transfer the design onto the model surface. This makes them ideal for achieving precise, clean results without the mess. In this article, we will provide a comprehensive guide on how to apply dry transfer decals, including preparation, application, and advanced techniques.
Preparing Your Decals and Surface
Before applying dry transfer decals, it’s essential to prepare both the decals and the model surface. Start by carefully cutting out the individual decals from the plastic sheet, leaving a small border around each design. Make sure to handle the decals by the edges to avoid touching the adhesive surface. Next, clean the model surface thoroughly with a soft brush or cloth to remove any dirt, dust, or oils. If necessary, apply a coat of primer or paint to the surface to create a smooth, even finish. This preparation ensures that the decals will adhere properly and look their best.
Applying Dry Transfer Decals
To apply dry transfer decals, start by peeling the backing paper from the decal, taking care not to touch the adhesive surface. Place the decal on the model surface, aligning it with the desired position. Use a burnisher or stylus to gently rub the decal, starting from the center and working your way outwards. Apply gentle pressure, increasing it as needed, until the decal is securely attached to the surface. Use a soft brush or cloth to remove any air bubbles or excess adhesive. This method ensures a smooth, professional finish.
Working with Clear Decal Paper and Water Slide Decals
Clear decal paper can be used to create custom decals or to apply dry transfer decals to complex surfaces. To use clear decal paper, cut out the desired design and apply it to the model surface using a small amount of water or decal setting solution. Allow the decal to dry completely before applying a clear coat of varnish. Water slide decals can also be used in conjunction with dry transfer decals to create complex designs or to add additional details. Apply the water slide decal according to the manufacturer’s instructions, then use a dry transfer decal to add additional details or textures. This combination allows for greater creativity and detail in your projects.
Advanced Techniques and Troubleshooting
For more advanced modelers, dry transfer decals can be used to create intricate designs and details. To achieve this, use a combination of different fonts, colors, and techniques, such as layering or masking. If you encounter any issues during the application process, such as air bubbles or excess adhesive, use a soft brush or cloth to gently remove the decal and reapply it. To prevent the decal from lifting or peeling off, apply a clear coat of varnish or sealant. With practice and patience, you can master the art of applying dry transfer decals and take your scale modeling skills to the next level.