How to Restore Vintage Audio Lettering Without Decal “Ghosting”
The secret to restoring vintage audio lettering without the telltale “ghost” outline is using dry transfer lettering instead of waterslide decals. Unlike waterslides, which leave a visible clear carrier film around each letter, dry transfers deposit ink directly onto the metal surface with no film at all. The result mimics the original factory silk screening—just pigment bonded to aluminium, with no border or sheen difference to betray the repair.
Dry transfers (also called rub-on transfers) work through pressure rather than water. You position the transfer sheet over your faceplate, burnish the back with a stylus or smooth tool, and the ink releases from its carrier and adheres to the metal. When you peel the backing away, only the lettering remains. The deposited ink sits at just 1–2 microns thick—virtually identical to original silk-screened text—and produces results that are visually indistinguishable from direct printing.
The process requires careful restoration techniques: thorough surface preparation with naphtha or isopropyl alcohol, precise alignment using the “hinge method” with painter’s tape, and thorough burnishing to ensure complete transfer. While dry transfers are more fragile than waterslides before sealing, they eliminate the ghosting problem entirely. For vintage receiver faceplates where authenticity matters, this carrier-free approach is the preferred method among refurbishing specialists.
Why Do Vintage Faceplates Lose Their Lettering?
Vintage high-fidelity equipment from the 1960s through 1980s—receivers, amplifiers, and tuners from Pioneer, Marantz, Sansui, and similar manufacturers—used silk-screened paint to apply control labels onto brushed aluminium faceplates. This screen printing process deposited a thin layer of ink directly onto anodized metal. While visually striking when new, this lettering was never designed for decades of use.
The “Screen Print” Weakness
Factory silk screening created text that was essentially surface-bonded paint with no protective enamel layer. Over time, the combination of heat cycling from internal components, UV exposure from room lighting, and gradual oxidation weakens the bond between ink and metal. The lettering becomes brittle and can begin flaking with minimal contact.
The anodized aluminium substrate compounds this fragility. Anodizing creates a porous aluminium oxide layer (Al₂O₃) that accepts dyes and inks, but this same porosity means the bond relies on mechanical adhesion into microscopic pits rather than chemical fusion. Heat from dial lamps, power transformers, or circuitry gradually dries out the ink binder, and what was once firmly attached becomes precarious. A single cleaning session—or even repeated brushing from hands adjusting controls—can lift letters that have silently degraded for years.
Modern audio equipment often uses more durable processes like pad printing with epoxy inks or laser engraving, but vintage gear predates these advances. The delicate silk-screened text on a 1970s receiver requires careful handling to preserve.
Common Cleaning Mistakes
More often than age alone, improper cleaning destroys vintage faceplate lettering. The thin silk-screened ink dissolves readily in common household chemicals that seem harmless. Many collectors have learned this lesson the hard way—a quick look at any vintage audio forum reveals countless cautionary tales of missing text after routine cleaning.
Chemicals that damage vintage lettering:
- Ammonia-based glass cleaners (Windex): Ammonia attacks silk-screen inks and can discolour anodized aluminium. One Carver audio technician’s advice is unambiguous: “NEVER use any product with ammonia… includes never use Windex.”
- Degreasers (409, Simple Green): These cut grease effectively but also cut through silk-screen paint. Community reports describe wiping off all lettering in a single pass—leaving a mess where pristine labels once sat.
- Isopropyl alcohol and solvents: Rubbing alcohol, acetone, and lacquer thinner dissolve the ink binder instantly. These materials are useful for stripping lettering intentionally but will remove text on contact.
- Abrasive pads and polishes: Magic Erasers (melamine foam), scouring pads, and aggressive metal polishes physically abrade the thin paint layer. Even gentle abrasives can leave shiny spots on brushed aluminium where text once was.
- Oil-based cleaners (WD-40): Penetrating oils can seep under silk-screen paint and undermine adhesion, causing letters to lift during wiping.
What to use instead: The safest approach is warm water with a small amount of mild dish soap (like Dawn). Remove the faceplate from the chassis if possible, soak briefly to loosen dirt and grime, and wipe gently with a microfiber cloth—never scrubbing over lettered areas. For stubborn residue on bare metal sections, a cotton swab with diluted white vinegar can help, but keep it away from printed text. This knowledge will save your collection from irreversible damage.
Waterslide Decals vs. Dry Transfers: The Comparison
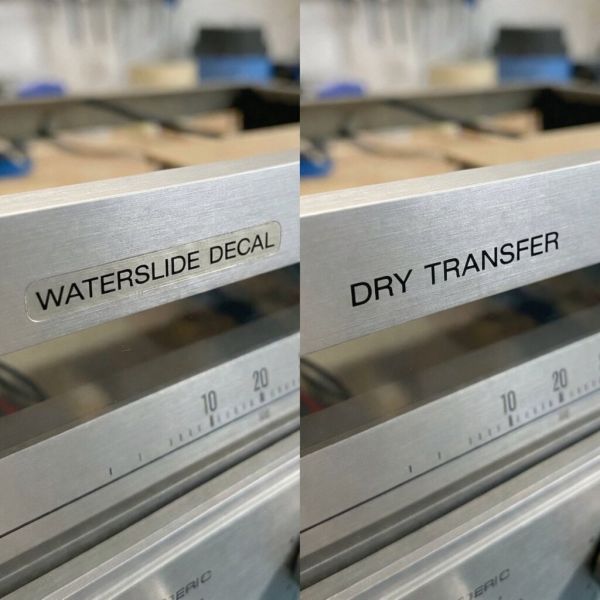
When lettering is already gone, restoration requires adding new text to replace what’s missing. Two methods dominate DIY approaches: waterslide decals and dry transfer (rub-on) lettering. The difference in results is dramatic.
The “Ghosting” Effect Explained
Waterslide decals print text onto a thin polymer carrier film. You soak the decal in water, slide it onto the surface, and the ink—still attached to its transparent film—adheres via a water-activated adhesive. The problem is that the clear film remains in place permanently, creating what amounts to a visible sticker outline.
On glossy painted surfaces, this film can be nearly invisible. On brushed aluminium faceplates, it creates a visible artifact restorers call “ghosting.” The carrier film has a different refractive index than bare anodized metal, meaning it reflects and transmits light differently. At certain angles, you see a rectangular outline or subtle halo around each letter where the film edge catches light. The effect is especially pronounced on textured surfaces: the film bridges the peaks of the brush grain but fails to conform to the microscopic valleys, trapping air and creating silvery patches.
This ghosting immediately identifies a restoration as a repair rather than original—a concern for collectors who value authenticity. As one DIY restorer reported after attempting waterslide labels on an amplifier faceplate, “the result works, but you can definitely tell that it’s a decal”—the edges remain visible under changing light.
Professional scale modellers have developed techniques to minimise this effect, including applying decals over glossy clear coats, using setting solutions to chemically soften the film, and “burying” decals under multiple layers of clear coat that are then wet-sanded flat. These methods work but require significant labour, spray equipment, and finishing skill that most audio restorers would rather avoid.
Why Dry Transfers Look Like Factory Paint
Dry transfer lettering eliminates ghosting by eliminating the carrier film entirely. The technology, popularised by the Letraset brand for graphic design work, deposits only the ink itself onto the target surface—no film, no visible edges.
A dry transfer sheet holds lettering printed in reverse on a translucent carrier. The ink is backed with a pressure-sensitive adhesive rather than a water-activated one. When you position the sheet and rub firmly over the back with a burnishing tool, the pressure shears the ink from the carrier and bonds it to the metal below. Peeling away the backing leaves just the lettering—no border, no ghost.
The technical advantage is clear: dry transfers deposit only the ink itself, with no carrier film remaining after application. The deposited ink is extremely thin (1–2 microns), sits flush against the aluminium grain, and reflects light identically to the surrounding bare metal. The result appears as if it was printed directly to the surface—because functionally, it was.
Quality dry transfers can also achieve finer detail than most home-printed waterslides. Commercial services produce lettering with crisp text and sharp edges using opaque inks that match the density of original silk screening. Custom providers can even colour-match specific vintage hues, including metallic gold and silver—ideal for restoring classic Marantz gear with its distinctive champagne accents.
Durability and Heat Resistance
Dry transfers sit directly on the surface with no protective film, which raises durability questions. How do they compare to vinyl-backed waterslides, and can they handle heat from tube amplifiers or warm receiver chassis?
Raw durability: Unburnished dry transfers are fragile—the ink can be scratched off with a fingernail. Once fully burnished and bonded to clean metal, they hold better but remain vulnerable to abrasion. Industry documentation notes that dry transfers “are not resistant to scratching” in their raw state. This is similar to original silk-screen lettering, which also scratches if gouged. Many restorers opt to seal their work with a light clear coat for protection; others leave transfers uncoated and simply handle the faceplate carefully. Reports from long-term users indicate that well-burnished, uncoated dry transfers can remain intact for the rest of the equipment’s life with normal use.
Heat resistance: Dry transfers handle typical electronics operating temperatures without issue. The inks and adhesives contain no thick vinyl layer that might soften or curl with warmth. Vintage tube amplifiers can generate localised heat of 50–70°C on faceplate areas near output tubes, and solid-state receivers run cooler still. Dry transfer pigments tolerate these temperatures readily. Waterslide decals printed with home inkjet inks are actually more vulnerable to heat-related fading or discolouration if not sealed with UV-resistant clear coat.
The practical conclusion: dry transfers are durable enough for normal display and operation. If the front panel will see frequent handling, cleaning, or live in a high-traffic environment, sealing with a thin clear coat provides insurance without adding visible bulk.
Step-by-Step: Re-Lettering Your Receiver Faceplate

Restoring faceplate lettering with dry transfers requires methodical preparation, careful alignment, and patient burnishing. The job is straightforward but unforgiving of shortcuts. These tips will help ensure success on your first attempt.
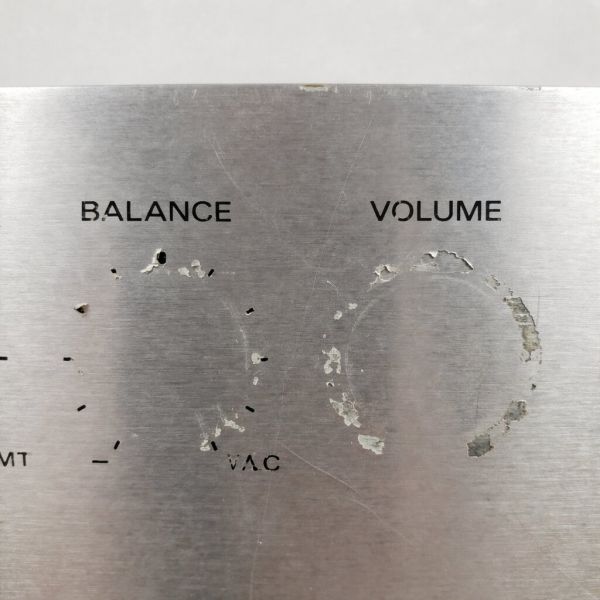
Step 1: Safe Removal of Old Text
Before applying new lettering, remove any remnants of the original. Partial letters or adhesive residue will prevent clean transfer adhesion and create an uneven surface.
Technique: Use a wooden toothpick or plastic scraper to gently lift flaking paint. Wood and plastic are softer than aluminium and won’t scratch the anodized surface. Work under good lighting and pick at the edges of remaining letters until they release. Stubborn fragments may need softening with a tiny amount of naphtha on a cotton swab—but use this sparingly and only on bare metal areas, as it will damage adjacent intact lettering.
For the final cleanup, a non-abrasive automotive polish (such as a swirl remover or finishing polish—not a rubbing compound or metal cream) applied with a microfiber cloth can remove the last film of old paint and any discolouration “shadow” where text once sat. Polish only the affected area, using small circular motions, and stop when the surface appears uniform. Aggressive polishing risks removing the anodized layer itself, creating a bright spot that will never match the surrounding finish.
Step 2: Preparing the Aluminium Surface
Clean metal is essential for dry transfer adhesion. Any contamination—oils, polish residue, fingerprints—creates weak spots where letters may fail to bond. Without proper preparation, you’ll be lucky to get consistent results.
Protocol: Wipe the entire faceplate (or at least the areas receiving new text) with a lint-free cloth dampened with naphtha or 99% isopropyl alcohol. Naphtha is particularly effective at cutting waxy polish residue without leaving its own film. Allow the surface to dry completely.
After solvent cleaning, avoid touching the prepared areas with bare hands. Wear clean nitrile or latex gloves from this point forward. Some restorers follow with a wipe of diluted white vinegar (a mixture of 50/50 with distilled water), which microscopically etches the aluminium surface for better adhesion—though this step is optional and must be fully wiped away with distilled water before proceeding.
The goal is a chemically neutral surface with high surface energy, meaning liquids and adhesives will wet out and bond rather than bead up.
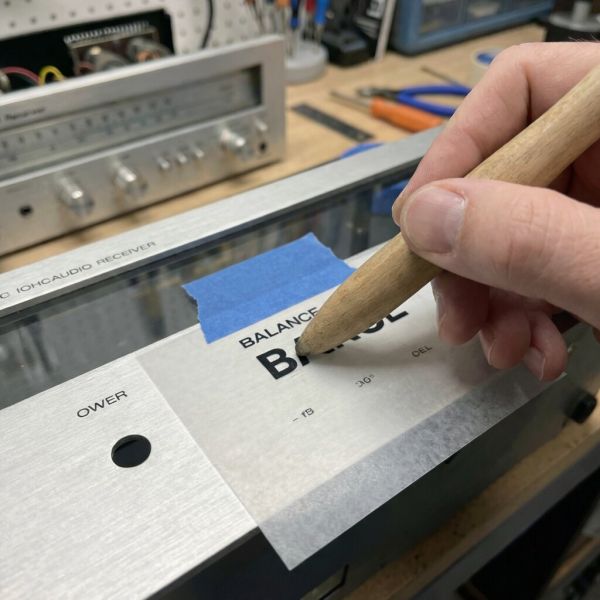
Step 3: The “Hinge Method” for Alignment
Precise alignment is critical. Crooked or misplaced text immediately signals a repair and undermines the careful restoration work you’ve done. The hinge method allows you to position, verify, and reposition the transfer before committing.
Process:
- Cut and position: Trim the dry transfer sheet to include your target text with a small margin. Hold it against the faceplate and adjust until the lettering aligns perfectly with knobs, edges, and any remaining original text. Use reference photos of intact units if needed.
- Create the hinge: Secure one edge of the transfer sheet to the faceplate with a strip of painter’s tape (low-tack masking tape). This creates a hinge that lets you flip the sheet up and down while maintaining registration.
- Verify alignment: Flip the transfer down into position and confirm alignment. Flip it up, adjust the tape if needed, and repeat until perfect. The hinge holds your position through the entire application.
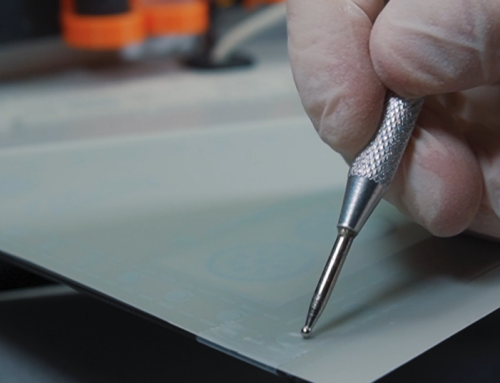
- Burnish: With the transfer hinged in final position, hold the sheet firmly flat and begin rubbing the back with a burnishing tool. A dedicated stylus works well, but the back of a plastic spoon, a smooth pen cap, or a popsicle stick also work. Apply firm, even pressure and cover every part of each letter with overlapping strokes.
- Peel and check: Slowly lift one corner of the transfer sheet and peel back at a sharp angle. The letters should release from the backing and stay on the metal. If a letter lifts with the sheet, lay it back down and burnish that spot more aggressively. Continue peeling until the full transfer is complete.
Step 4: Burnishing and Sealing
After the backing is removed, the letters are on the faceplate but may not be fully seated. A final burnish locks them in place and ensures longevity.
Final burnish: Place a piece of clean paper (the blank backing from the transfer works well) over the new lettering and rub firmly with your burnishing tool. This presses letters into the aluminium grain without risking damage from direct tool contact. Pay special attention to small details—serifs, dots, thin strokes—that may not have transferred fully.
The clear coat question: Whether to seal the new lettering with clear coat is the most debated topic in faceplate restoration. Both approaches have merit, and there’s no single right answer—it depends on your priorities.
Arguments for clear coating:
- Provides scratch protection, making lettering as durable as original silk screening
- Allows future cleaning without worry of damaging transfers
- Can unify surface sheen if parts of the faceplate have different wear patterns
Arguments against:
- Alters the appearance of bare brushed aluminium (even “clear” coats add some gloss or texture change)
- Introduces application risk—spray solvents can lift transfers if applied too heavily on the first coat
- Makes the restoration less reversible; removing clear coat later means removing lettering too
- Requires spray equipment and a controlled environment to avoid dust inclusions
Middle-ground options: Some restorers use a microcrystalline wax (like Renaissance Wax) instead of lacquer. Wax provides mild protection against handling and moisture while remaining completely reversible. It won’t armour-plate the lettering like clear coat but adds a sacrificial layer that can be renewed periodically.
If you do choose to clear coat, use a compatible spray lacquer (acrylic lacquer like Krylon is common) applied in very light mist coats. The first coat should be barely more than a dusting—heavy first coats contain enough solvent to lift the transfer adhesive. After the first coat dries, build with slightly heavier passes until protected. Match the sheen to the original faceplate: most vintage gear was satin or semi-gloss, not high-gloss.
Finding the Right Font and Size
Restoration quality depends not just on technique but on typographic accuracy. The wrong font or size immediately marks a repair and can make otherwise excellent work look amateurish. Beyond the physical transfer process, font matching may be the most challenging aspect of the job.
Matching Classic Brands (Pioneer, Marantz, Sansui)
Vintage Japanese and American audio manufacturers used typefaces common to the 1960s–70s industrial design era, often in proprietary variations. Understanding these choices helps you select appropriate replacements.
Common vintage audio fonts:
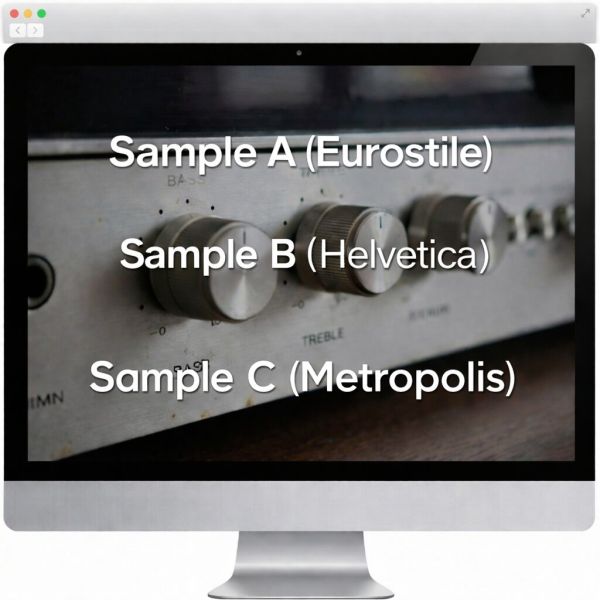
- Eurostile / Microgramma: The quintessential “1970s hi-fi” look—squared-off letters with rounded corners that evoke technical precision. Extensively used across the industry for control labels.
- Helvetica: A workhorse sans-serif, though vintage gear often used specific weights (Medium, Light) that differ from modern computer defaults.
- Metropolis: Identified as the typeface used on many Marantz receivers, giving them their distinctive technical aesthetic with characteristic Latin serifs.
Identifying your specific unit: The best approach is to find high-resolution photographs of an intact example of your exact model and overlay your proposed lettering digitally. Adjust font, size, and spacing until they match. Simple word-processing fonts may not be exact matches; you may need to explore font libraries or purchase period-accurate typefaces.
Sizing: Measure existing letters on your faceplate if any remain intact, or reference photos with known dimensions. Most receiver control labels are small—2 to 4 mm tall (roughly 6–12 point). Order transfers in the correct size; scaling afterward isn’t possible with physical media. If in doubt, measure twice before placing your order.
Custom vs. Generic Sheets
You have two sourcing options: pre-made generic sheets with common audio terms, or custom-printed transfers with exact text for your unit. Each approach has advantages depending on your budget and authenticity requirements.
Generic “Common Audio Words” sheets: These include terms like Volume, Bass, Treble, Balance, Phono, Aux, Stereo, Mono—the standard vocabulary of vintage hi-fi and radio equipment. Available from hobby suppliers and restoration vendors, they offer convenience if the font is close enough and you only need standard labels. The money saved compared to custom work may be worth accepting a slightly imperfect match.
Custom dry transfers: For exact font matching, specific model numbers, brand logos, or unusual terminology, custom printing is necessary. Services like CROTRAN produce transfers from customer-supplied artwork. You provide vector files (Adobe Illustrator or similar) or detailed specifications, and they print a sheet with your exact requirements. Custom services can also match Pantone colours, including metallic gold and silver for Marantz-style accents.
Custom transfers cost more (typically priced per sheet regardless of how much text you need) and require lead time, but for high-value restorations where authenticity matters—particularly if you plan to sell or display the equipment—the match is worth the investment. If restoring multiple units, combine all needed text onto one sheet to maximise value. Many restorers keep spare transfers in stock for future touch-ups or additional projects.
Content Compliance Statement
This article was created by the team behind Custom Rub-On Transfers, led by Charles Platon, who has over two decades of experience in dry transfer manufacturing and surface design.
We strictly follow Google’s content guidelines by ensuring that all material:
- Is written by humans, for humans — not mass-generated or automated.
- Focuses only on our area of expertise: dry transfers and precision surface lettering.
- Avoids spammy SEO tactics like keyword stuffing or clickbait.
- Is based on real-world use, not recycled from other sites.
Transparency
This article was written in-house by our small, experienced team of transfer technicians and restorers, under the direction of Charles Platon.
How was it created?
We draw from our real production workflow and hands-on client work, supplying dry transfers for museums, curators, and industrial designers.
Why did we write it?
To share the same museum-grade knowledge we use in our studio—so collectors, hobbyists, and professionals can achieve equally authentic results.
